|
The Key to Heaven Hung on a Nail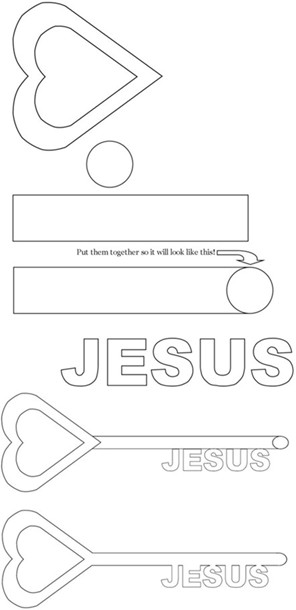
I found this key phrase on www.signsermons.com where I look for sayings to use at my church. One day I ran across this saying and I immediately started thinking about how to use it for our Easter bulletin board. Do all of the following steps to get everything ready for the kids to do the rest. On the day we had them do this our Bible time was about asking Jesus into your heart and how he is the only way to heaven. First I cut out the letters in both green and black using our Accucut machine. Second I went to the computer and used my photo editor, I happen to like Microsoft Digital Image Suite, and used it to make the key template. (I haven’t worked much with Paint but you can probably use it for this) You can make this whole project on one work area but I used three so it would be easier to keep the steps apart.
Use the same template for the big key. I zoomed the copier to print it as large as I could using two sheets of black construction paper. After you copy both ends, using the same size zoom, then cut them out. You will find that you can now make the ‘stem’ of the key to be any length you want it to be. I used a light gray sheet of construction paper to cut out the nail, I just cut how I thought it would look. I then picked out the background paper and laid it on the floor. I put the key down approximately where I wanted it, figured out where the nail would have to be and put a small dot on each side of the nail below it’s ‘head’. I removed the nail and key and made a slit in the paper between the tow dots I just made. Put the nail in and make sure that it will not slip through or that you have made the slit long enough. If you want to make sure that the slit does not rip, put tape at both ends on the back side. Just think now that you’ve done all these steps, the only thing you need to do next time is make copies. Now it’s time to get it on the wall… I think you can handle that one:)

Leave the Key to Heaven and return to the miscellaneous page.
|

