Smiley faces can be changed along with the seasons
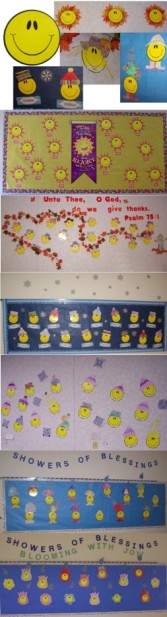
So you want to use smiley faces as your classroom theme. We used the basic smile face from Carson-Dellosa. At the beginning of the year we put up a smiley for every child that was to attend our class. Next we added their first name, the first year we had labels with their name stuck right below the smile, the second year we put their names on something related to the season. You will see examples of both in the pictures at the right of the page. For each of the seasons I found clipart from a book and used the copier to blow up the image until it fit with the smiley:
- Beginning of the year - Cut out bowties for each smile, girls in the ‘hair’ boys at the bottom (neck tie)
- Fall - I blew up the head of a scarecrow and cut out the hat. Once it is the size you want then you need to make enough copies for each child to color or decorate their own. I then used some shredded manila paper for straw (yarn would probably work), and taped it to the underside of the cut out hat.
- Winter - Using the same methods as above I found 4 or 5 hats and had them blown up. If you want a slightly different look you can use colored cotton to make the balls of the hats fluffy or ribbon for the top hat.
- Spring - Rain hats, boots, and umbrellas are needed for this one. I cut out raindrops and each of the children wrote there name on theirs.
- End of the year - This was by far the most difficult one of them all to put together. Finding the flowers was not that hard but getting them blown up and removing the center and making it all the right size did take some time.
As you can see in the picture of assembled close-ups the extra smiley faces that were around the room were also used to decorate in the theme. (ie: the leaves behind the smiley)

Leave the smiley faces page and return to the themes page.

|
